Homemade Gluten Free Gyozas

So, Gyoza are something we have a wagamamas on occasions and, although we love them, they are pretty expensive for what you’re getting. It isn’t something I had ever thought about trying to make before but I had a craving and decided to look up some recipes for inspiration.

As I’m sensitive to gluten, it made sense that I should make a gluten free gyoza dough. After looking at many recipes I found this one here, it looked pretty straight forward so i was just going to make it, until i realised I didnt have any millet flour. So I did some research and found that I should be able to use quinoa flour instead of the millet.. Seeing as this is a new thing to me, I thought  ‘Hey, lets wing it and see’. So the dough I have made is not my own, just an adaptation of this one.

Now, with the filling, I really wanted something simple with just vegetables and most of the recipes I found contained either meat, tofu or some exotic ingredients that I havent heard of! So instead of following a recipe I adapted this one and made it with simple ingredients you’re likely to have in the cupboard!

Making the gyozas was a pretty long winded process but it was an easy one and definitely worth the time! They were absolutely delicious and tasted fantastic dunked in the dipping sauce from this recipe.

img_20160222_162904.jpg

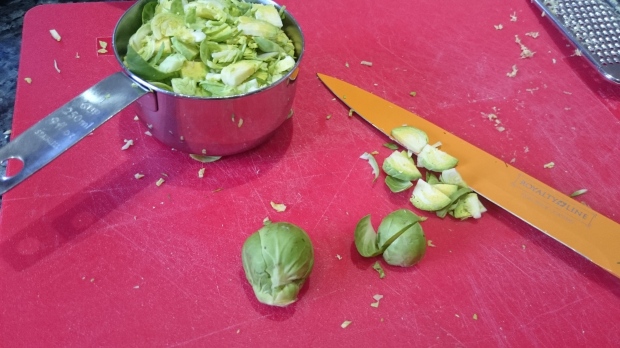
For most of the filling recipes I looked at they called for many different types of cabbage, mostly  wombok but alas, this is not readily available when I live so instead of going out to hunt for a replacement I noticed we had a large stockpile of sprouts which are basically baby cabbages. Thankfully, they worked perfectly and tasted fantastic. Not only that but they were super easy to shred finely. So yeah, you can play around with sprouts or whatever cabbages you can get your hands on! Go wild!

dsc_1841.jpg

I started by making the filling, so that it had time to chill before it was time to use it. If you have the means to chill the filling whilst the dough is resting, then make it after you’ve made the dough! It will work either way.

Ingredients for the filling

  • 100g mushrooms finely chopped (I used chestnut)
  • 2 spring onions thinly sliced
  • 2 large cloves of garlic, crushed
  • 1 cup of finely shredded cabbage (I used sprouts)
  • 1 packed tbsp grated ginger
  • 1 carrot, grated
  • 1 tbsp soy sauce
  • 1/2 tbsp rice vinegar
  • 1 tsp sesame oil

Heat the oil in a frying pan and add the mushrooms, onion, garlic, cabbage, carrot and ginger. Fry for around 6 minutes till the cabbage has wilted and the carrots have softened. Stir in the soy sauce and rice vinegar. Take the pan off of the heat and transfer the mix to a bowl to cool. Place to one side until you are ready to use it.

Ingredients for the dough

  • 95g tapioca starch
  • 95g quinoa flour
  • 122g glutinous (sweet) rice flour + more for dusting
  • 2tsp xanthan gum
  • 3/4 cup of just boiled water
  • 1-2tsp cold water
  • 2 cups of dumpling filling

Mix together the tapioca starch, quinoa flour, sweet rice flour and the xanthan gum in a bowl. Pour in the just boiled water and stir together to create a crumbly mixture. Now, using your hands, knead in 1-2 tbsp of cold water to bring the mixture into a smooth ball of dough. Place the ball of dough into a plastic bag, prefereably zip-top, squeeze the air out then close. Let the dough sit in the bag for between 15 minutes and 2 hours.

To form the dumplings: Lightly flour the work surface with sweet rice flour. It is easier to work with just a quarter of the dough at a time, this prevents the dough drying out, so keep the dough in the bag till ready to use. Take portion of dough and roll it into a sausage shape that is around 1 inch thick. Cut this into 8 equal protions. Coat the ends of each piece with rice flour. Using your hands, press each piece into a little disk and place onto your floured surface. Roll the disk into roughly a 3 inch round using a rolling pin. Fill the wrapper with 1-2 tsp of filling, wet the edge of the wrapper with a small dab of water and close. Push the edges together into a half moon shape, stand it up, then to esure it stays shut, pinch the edges (see pictures below). There are fancier shapes you can make once you get confident, but this is a good place to start. Repeat with all of the portions of dough and place each gyoza onto a lightly floured baking tray. These are best cooked shortly after making them, but i did find they could be stored in a sealed container and cooked the next day. Apparently they can also be frozen but I havent tried myself, so if you do, let me know.

To cook: Pan fry the dumplings in batches of as many that will cover the bottom of a frying pan. Be sure to use a  non-stick pan with a lid. Put enough oil in the pan to lightly cover the bottom. Turn it up to a medium-high heat and place the dumplings in, no need to leave to much space between them, just don’t let the dumplings touch or they may stick together. Brown the bottom of the dumplings, then pour in between 1/4 to 1/3 of a cup of water (depending on size of pan). Cover the pan, turn the heat to low and let all of the water bubble away. Once there is only a dribble of water left in the pan, tilt the lid to let the steam out and continue to cook. When the water is all gone remove the lid completely and turn the heat up slightly. Fry again till the bottoms are crisp then remove them from the pan with tongs. Serve with your dipping sauce of your choice!

My recommended sauce is here.

These photos below are how I closed up my dumplings.


A little tip: I always buy fresh ginger roots and stick them in the freezer! This way, it doesn’t go off and is super easy to grate, plus, if you need sliced ginger, just get the ginger out of the freezer to thaw in advance and it defrosts super easily! Also, i rarely peel my ginger if i’m grating it, you won’t even notice the skin in there.


Mushroom soup

As a child i was never a fan of mushrooms… actually, I really, really hated them. But, as I’ve grown up, I’ve grown to enjoy their earthy flavour. I’m still not a fan of the texture of a large chunk of mushroom but as a sauce or soup they are delicious. So here is one of my first experiments with mushrooms, besides the odd mushroom risotto.. (there will be a future post on this).

In this recipe I have used a few different flavours of stock, all in the kallo brand, you can use any vegan stock you have/can get hold of. I alway have a cupboard full of different stocks but I know this isn’t always the case, so, although it will alter the taste of the soup, it will still make a super tasty soup whatever stock you use!

dsc_1407.jpg

This soup is a big hit with my dad and boyfriend. It is creamy and filling and so easy to make and eat!

When making a soup, I like to cut things quite small so that they cook quicker as I’m very impatient.. as the photo below shows, this is how I cut my carrots as I always find they take far longer to cook than potatoes!


I usually blend my soups using an immersion/hand blender. you can use a normal stand up blender but you may have to blend in small batches, and open the top of the blender to let some of the heat out whilst blending. Or, maybe letting the soup cool completely before blending may be most appropriate and safer.

dsc_1411.jpg

Now for the recipe:GO!

Ingredients

  • 3tbsp oil
  • 1 large onion, diced
  • 250g chestnut mushrooms, sliced
  • 300g carrots, unpeeled & diced
  • 100g dried red lentils
  • 2 cloves of garlic, finely chopped or 1 tsp garlic granules
  • 1 mushroom stock cube
  • 1 french onion stock cube
  • 1.2 litres/6 cups of boiling water
  • 1 medium potato, cut into large cubes
  • Salt and pepper

You may also like to add 600-800ml of extra stock at the end of the cooking to thin out the soup. I prefer a thinner, more drinkable soup so i added extra veg stock in at the end of the recipe.

Method

Pour the oil into a large stock pot/pan and place it over a medium heat to warm the oil. Tip in the onions and mushrooms and sweat them for 5 minutes till the onions are translucent and the mushrooms are fragrant, stir a few times to ensure they dont stick to the bottom of the pot. Add the diced carrots and potatoes and cook for another 5 minutes, stiring regularly. Next add the lentils and garlic, again, stiring regularly. Once the garlic hars just started to brown, Pour in the boiling water and add the stock cubes, stir well to disolve. Bring it all to a boil and then turn down the heat to a gentle simmer. Let it simmer until the potatoes, carrots and lentils are all cooken. mine took around 15 minutes*. Take the pot of of the heat and blend with an immersion blender till smooth**.  Taste and add salt and pepper. Reheat if necessary. ENJOY!

*It may take longer, depending on how large youve chopped your veggies

**If you prefer a thinner soup, now is the time to add the extra stock, I used 800ml of veg stock, but just plain water would also work.

‘Chuna’

So, what is chuna? It is simply a recipe using chickpeas that tastes similar tuna. I never liked that ‘fishy’ taste as a whole but before I became vegan I did on the rare occasion have tuna on a jacket potato or in a sandwich. So I decided to recreate the taste using chickpeas and nori. The easiest way to get the sea taste is with nori, being seaweed it has the saltiness needed to replicate those ‘fishy’ notes.

Chickpeas work great in this recipe as they can mash well with a fork without becoming too mushy. I’m sure that if you didn’t have chickpeas, other beans should work, they may just alter the texture slightly. I like this recipe slightly chunky so mashing with a fork is my preference, but you could easily use a food processor to roughly chop up the chickpeas.. be careful though, for this recipe you don’t want to make houmous so go easy on the processing!
In my chuna I use tamari to keep it gluten free, if you don’t have tamari then use soy sauce it doesn’t alter the flavour at all so it’s all good!

As I mentioned above, this recipe is amazing in a jacket potato but I also love it in a sandwich with salad or even dolloped in a big bowl of pasta. I make my chuna using a little vinegar as that is what I used to mix with tuna, but you could use vegan mayo or salad cream. Your choice!

Ingredients

  • 1 can (400g) chickpeas
  • 2 nori sheets (shred fine, I used scissors)
  • 5 tbsp apple cider vinegar
  • 2 tsp tamari/soy sauce
  • Pepper to taste

Recipe
Drain chickpeas and tip them into a bowl. Smash the chickpeas with a fork until they are your desired consistency. Add the rest of the ingredients and mix well to combine. Serve.

Curried Coconut Quinoa with Stir-fried veggies

image

I love quinoa and always used to see it as an effort too cook as, well, it takes longer than cous cous. Doh. I’ve been trying to eat healthier recently so I’ve added quinoa in to my diet to bulk out meals and help me feel full. I am a fan of keeping things simple so this one pot, one wok dish is easy! And, if timed right will only take around 20-25 minutes to prep and cook (depending on how quick you are at preparing).

image

Being a fan of spice, I have used garam masala curry powder as my flavour base and I’ve added some extra chilli flakes too. If you arent a fan, use a mild curry powder and omit the chilli. I used 3 tsp of curry powder as I’m a fan of a big punch of flavour, if you’re making this for the first time, try 2 teaspoons first, let it simmer for 5 minutes then taste as you can always add more if you need it.

image

This recipe for quinoa serves 2, but the stirfry recipe underneath was all for me! So double if you’re making a meal for 2.

Ingredients
1 cup quinoa
1 can (400ml) coconut milk
1/2 cup water
2-3 tsp garam masala powder
1/2 tsp chilli flakes
1/2 tsp tumeric
1 packed tsp grated ginger
1/2 tsp garlic powder

Toast the quinoa in a pan for 3 minutes, stir frequently so that they don’t burn. Add in the coconut milk and water to the pan and bring to a simmer. Mix in the the spices and ginger then bring it to a boil. Once boiling turn the heat down to low/medium, cover and gently simmer for 15 minutes, or until all of the liquid has been absorbed by the quinoa. Serve!

I have served mine with a simple veggie stir fry. Start cooking this when the quinoa is almost done, or even once it has finished cooking, the quinoa will wait to be served.. the stir fry won’t, so don’t cook it too early.

Ingredients
2tsp oil (I used coconut)
70g broccoli
50g carrot
100g red pepper
50g asparagus
30g mange tout
a handful of kale
1 tsp packed grated ginger
1/2 tsp tumeric
1/4 tsp chilli flakes
1/4 tsp garlic powder

Heat 2 tsp of oil in a wok, get it nice and hot. Throw in the chopped veggies and toss to coat in the oil. Add the spices and ginger, toss. Continue to cook on a medium/high heat for 5 mins until the veggies are cooked. Serve.

image

Butternut squash and mushroom soup

So, last night I noticed a beautiful butternut squash sitting in the fridge and couldn’t decided what I wanted to do with it. I decided to half it and roast it so I could decide how I would use the flesh after it was done.
image

image

My first thought was a soup and with that, this recipe was born. It is simple but delicious and got both thumbs up from my parents.

image

Sometimes,  simple is best so here it is, very few ingredients most of which are usually found at home!

Ingredients

  • 1/2 a white onion
  • 5 chestnut mushrooms
  • 1 tbsp oil
  • 1 large clove of garlic
  • 1/2 a roasted butternut squash *
  • 1 1/2 cup of stock **
  • 1 1/2 cups of water
  • 2-3 tsp vegetable boullion/stock powder
  • 1 tsp mixed herbs
  • Salt and pepper to taste

Method

Fry mushrooms and onions till mushroom are translucent. Add the garlic and cook till it is starting to colour. Throw in the cooked butternut squash and cook for 5 mins till it falls apart and starts to heat through. Add the water, stock and boullion stir well and turn up the heat to bring to the boil. Once boiling, reduce heat and let simmer for 10 minutes. Taste the soup, add salt and pepper to taste. Take the soup off of the heat and either serve as it is, or let cool for a few minutes before using a hand blender***to blend the soup to desired consistency.

image

Tips
* I roasted my butternut squash halved on a baking tray, skin down. I rubbed the flesh with oil and mixed herbs before roasting for roughly 50-60 minutes.
** Can use all stock, or all water. If you don’t have any homemade stock you can just up the amount of boullion powder used, roughly 5-6 tsp.
*** Don’t have a hand blender? Use a normal blender.. but be careful,  you may need to blend in small batches as to not overheat the machine.

Tofuuuu

Okay, so I was always certain that I hated tofu when I was younger… until I realised I just had no idea what I was doing with it. I have since learned that the taste of tofu is all in the marinated or coatings you use. Tofu is simply an amazing carrier for flavours and can have a beautiful texture depending on what  you do with it.

image

So, today I decided I was going to have a noodle soup for dinner. I am a huge fan of a nice simple noodle soup full of veggies but today I wanted to go all fancy and throw some tofu into the mix. And that is how this recipe was born. An easy fried marinated tofu which is spicy with a ginger bite.

image

I used a silken tofu today (as it is all I had in the cupboard), but a nice firm tofu would be far better at holding together in slices. Silken tofu still worked as the texture is beautifully smooth and the edges charred wonderfully,  but again, a firmer tofu which would hold its shape would be my usual tofu of choice for this type of cooking.

I pressed my tofu before use and I simply use two chopping boards, some kitchen towel and a 1kg tub of peanut butter and left it for just 15 minutes. Easy.

This marinated tofu would work with many other dishes such as a nice, crisp stir-fry or in a bun with a salad.

image

The recipe:
Ingredients
 1tbsp tamari
 1tsp red pepper flakes
 1 inch of ginger grated
 1/4tsp garlic powder
 1/2tsp turmeric
 1tsp agave syrup
 1/2 block of pressed tofu
 Roughly 1-2 top oil (I used sesame)

Mix up all of the ingredients in to a bowl apart from the tofu. Slice the tofu into 6 slices (mine crumbled slightly, but that is okay,  these smaller bits crisped up beautifully during frying). In a dish, lay the tofu out in a single layer. Spoon roughly a teaspoon of marinade on each slice and rub it in with the back of the spoon. Once each piece of tofu has some marinade on, pour the marinade in to the dish around the tofu and gently lift each tofu slice to get the marinade under the slices. Let the tofu sit for a minimum of 15 minutes or until it is needed. The longer it is left in the marinade the stronger the flavour in the tofu. To finish the tofu, drizzle a small amount of oil into a frying pan, on a medium to high heat. Place the tofu carefully in the pan and cook on the first side for a couple of minutes, until the underside starts to look charred. Then flip, and do the same on the other side.  Serve however desired.

New tablet!!

Fingers crossed this will make blogging easier and I’ll be able to do so more frequently. 
• I can now use bullet points. 
• Easy peasy for writing recipes.
• New keyboard should arrive soon then I am all set to get my blog on.
Bullet points, just because I can. 

I’m sucking at this!

But I am working on two new recipes to share here on the blog very soon.

A butterbean sauce which tastes super good on spaghetti!

image

And a korma from scratch (which is one of my favourites!

image

Sorry I’m taking so long with these, Christmas is a busy time at work so I’m finding very little time to experiment and play around with recipes. I’m still around, just slow.

Much loves!

Hey everyone! I have twitter!

So I’ve created a twitter account. 
Bare with me, I have no idea how to use it at the moment but I am trying. My user name is @herbikitchen. I’ll be posting both food stuff and general life things.. Also maybe the occasional pictures of my much loved animalbabies.

image

Example:  This is beanie the cat and Albert EinSpine the pygmy hedgehog. They may be featured from time to time (that cute factor, of course)

Much loves peeps!